
Vegan Banana Bread Recipe That’s Fluffy and Full of Flavor
What if you could bake something so moist and flavorful that even non-plant-based eaters beg for seconds? This isn’t just another dense, crumbly experiment—it’s a game-changer.
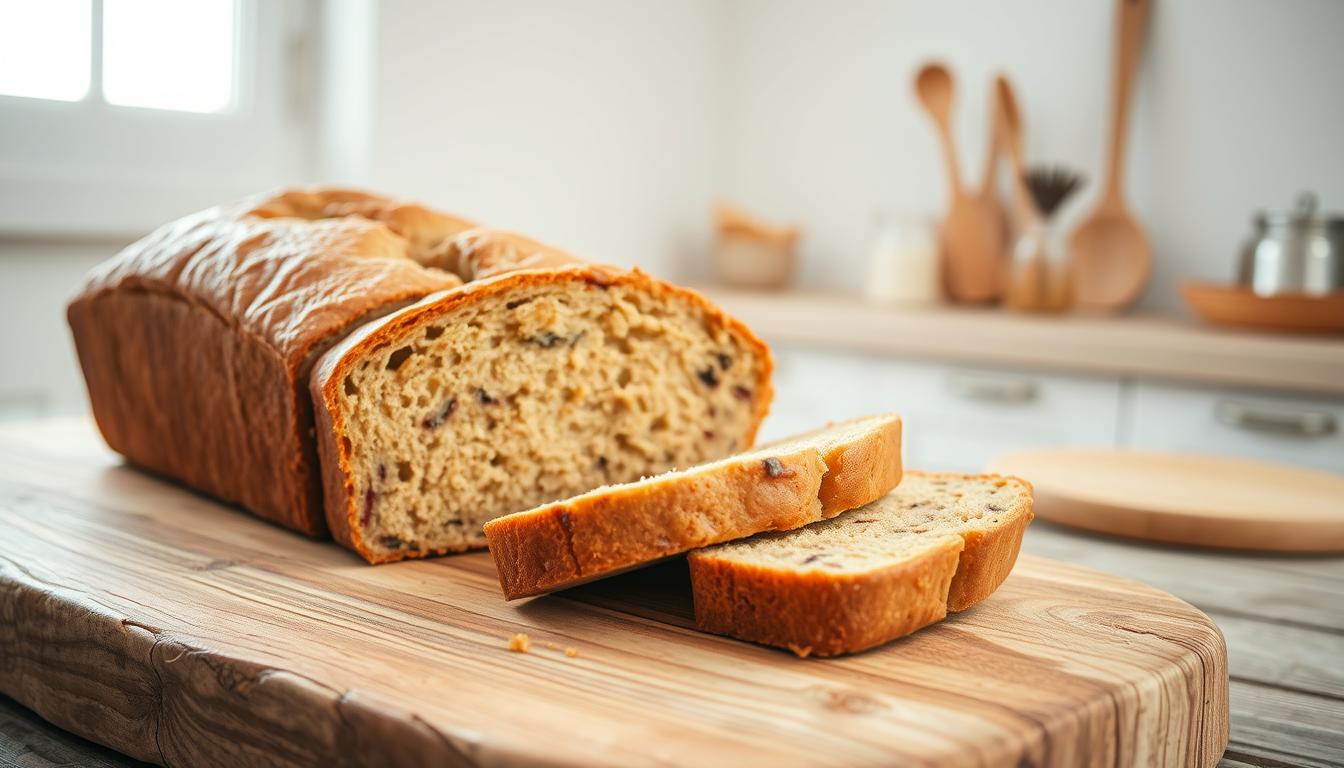
Using overripe bananas and smart substitutions, this method creates a golden-crusted delight that’ll make you rethink everything you know about egg-free baking.Make your day with our simple vegan banana bread recipe. Enjoy a moist, fluffy, and flavorful treat that’s easy to bake.
One bowl. Ten minutes of prep. That’s all it takes to whip up this crowd-pleaser. Whether you need gluten-free options or prefer oil-free versions, the formula adapts effortlessly. No specialty stores required—just pantry staples transformed through clever technique.
The magic lies in balancing moisture and lift. While some plant-based treats turn gummy, this loaf stays tender yet sliceable. Those speckled brown bananas? They’re not just reducing food waste—they’re creating natural sweetness that needs zero refined sugar boosts.
Key Takeaways
- Uses a single mixing bowl for minimal cleanup
- Adaptable to gluten-free, oil-free, and nut-free diets
- Transforms overripe bananas into perfect texture
- Requires basic tools and ingredients
- Appeals to both plant-based and traditional bakers
Introduction and Overview
Imagine biting into a slice so tender it melts on your tongue—no eggs, butter, or milk required. Plant-based baking has evolved far beyond chalky textures and bland flavors, and this loaf proves it. By swapping traditional ingredients with clever alternatives, you get a treat that’s moist without being soggy and rich without heavy dairy.
What Makes This Version Stand Out
Instead of relying on animal products, flaxseed or applesauce binds the batter while adding fiber. Non-dairy milk keeps crumbs soft, and coconut oil mimics butter’s richness. The result? A golden crust with a crumb that holds together perfectly—no dry patches or gummy layers.
Who Needs This Recipe
Whether you’re avoiding allergens, cutting cholesterol, or simply curious, this formula works. Busy parents love its one-bowl simplicity, while eco-conscious bakers appreciate its lower environmental impact. Even skeptics won’t guess it’s egg-free when they taste that caramelized banana sweetness.
Common myths about plant-based treats—like being “too dense” or “missing flavor”—crumble here. Modern techniques ensure every slice delivers comfort without compromise. Keep it plain or toss in walnuts; either way, it’s a crowd-pleaser hiding in your fruit bowl.
Gathering Essential Ingredients
Ever wonder why some bakes turn out dry while others stay moist for days? The secret starts with what’s in your mixing bowl. Every component plays a specific role—from binding agents to texture enhancers—and knowing these functions helps you master substitutions without guesswork.
Ingredient Highlights and Substitutions
Three speckled bananas form the flavor foundation. Their natural sugars intensify as they ripen, reducing added sweeteners. Can’t find overripe ones? Bake unpeeled fruits at 300°F for 15 minutes to mimic caramelization.
Brown sugar adds depth but swaps easily. Coconut sugar works for earthy notes, while maple syrup creates chewiness. Need less sweetness? Cut sugar by 25% and boost cinnamon or vanilla.
Flour options shape texture. All-purpose gives classic lightness, while whole wheat adds fiber. For gluten-free versions, blend oat and almond flours. Soy milk’s higher protein helps structure, but almond or oat varieties work if nut allergies aren’t a concern.
Oil keeps crumbs tender. Melted coconut or vegetable oils blend seamlessly. Prefer fat-free? Applesauce adds moisture but may densify the crumb slightly. Experiment to find your ideal balance.
Preparing Your Baking Tools and Preheating the Oven
Perfecting your bake starts long before the batter hits the pan. Proper tool selection and oven setup determine whether your creation rises evenly or emerges lopsided. Let’s ensure every slice looks as good as it tastes.

Choosing the Right Loaf Pan and Equipment
Your pan’s dimensions matter more than you think. Use an 8½ x 4½-inch or 9 x 5-inch metal pan for ideal heat distribution. Glass or ceramic alternatives require adjusting bake times by 5–8 minutes.
| Pan Size | Bake Time Adjustment | Texture Impact |
|---|---|---|
| 8½ x 4½” | None | Tall, even rise |
| 9 x 5″ | -3 minutes | Wider, softer crust |
| Mini Loaf (6″) | -12 minutes | Denser center |
Line your pan with parchment paper or grease lightly with coconut oil. This prevents sticking without altering flavor. Position your oven rack in the lower third—this shields the top from over-browning while the center cooks through.
Preheat to 350°F (180°C) while mixing ingredients. A properly heated oven ensures immediate lift, creating that coveted domed top. Use one large mixing bowl to streamline cleanup—no need for multiple containers.
Timing is key: start preheating as you gather tools. By the time your batter’s ready, the oven will have reached the perfect temperature for consistent results.
Mixing the Wet and Dry Ingredients
The moment your spatula hits the bowl determines whether you’ll get cloud-like softness or a doorstop. Precision here separates good bakes from great ones. Follow these steps to build structure while keeping every bite tender.
Combining the Wet Ingredients
Start by mashing peeled fruits in a large bowl until no lumps remain. A hand mixer speeds this up—just pulse until creamy. Add melted plant-based butter, sweetener, and non-dairy milk. Whisk until glossy.
Why this order? Liquids blend evenly before thickening agents join. Pour the flax egg mixture last, stirring gently. You’ll see the mixture thicken slightly—this binds everything without gluten.
Sifting and Adding Dry Ingredients
Measure flour into a separate cup, then sprinkle baking soda and salt over it. This prevents clumps of leavening agents. Fold dry into wet using a spatula—no electric tools now.
Stop when streaks of flour disappear. Overmixing activates gluten, creating chewiness. The batter should look shaggy but hold its shape when scooped. A few lumps? Perfect—they’ll hydrate during baking.
Test readiness: let the mix rest 3 minutes. If it bubbles slightly, your chemical reactions are primed. Now’s the time to pour and bake.
Mastering the vegan banana bread recipe
The difference between good and exceptional comes down to technique. Three simple principles separate dense bricks from cloud-soft slices—mix minimally, measure precisely, and trust nature’s binders.
Key Techniques for Airy Perfection
Stop stirring before you think you should. When combining wet and dry ingredients, fold just until no flour streaks remain. Those lumpy patches? They’re insurance against overdeveloped gluten. A shaggy batter rises better than an overworked one.
| Leavening Agent | Quantity | Function |
|---|---|---|
| Baking Soda | 1 tsp | Neutralizes acidity for lift |
| Baking Powder | ½ tsp | Adds second rise in oven |
Speckled fruits do double duty here. Their pectin acts like glue while natural sugars keep crumbs moist. “You’ll never need store-bought egg replacers when fruit does it better,” says pastry chef Elena Carter.
Check your batter’s readiness with the ribbon test. Scoop some onto a spoon—it should hold shape briefly before melting back into the bowl. This viscosity traps air bubbles for maximum fluffiness.
Room-temperature ingredients blend smoothly without overmixing. Cold plant milk or solidified coconut oil creates uneven textures. Let everything sit out 15 minutes before combining.
Step-by-Step Baking Process
Timing transforms batter into perfection. Your oven becomes the final collaborator, turning simple ingredients into golden-brown magic. Let’s lock in moisture while creating that irresistible crust.

Baking Time and Temperature Guidelines
Preheat to 350°F (180°C)—consistent heat prevents uneven rises. Bake 50-70 minutes depending on pan size and added ingredients. Use this table to adjust for variations:
| Pan Type | Bake Time | Doneness Check |
|---|---|---|
| Standard Loaf | 55-60 minutes | Toothpick clean |
| Mini Loaves | 35-40 minutes | Edges pull away |
| Added Mix-ins | +5 minutes | Firm top springs back |
If the top browns too fast, tent foil loosely over it. Rotate the pan halfway for even coloring. Ovens vary—start checking 10 minutes before the minimum time.
Cooling and Slicing for Best Results
Let the loaf rest in the pan 15 minutes. This prevents collapse by letting steam escape slowly. Transfer to a wire rack for 30+ minutes. Room temperature cooling stops gummy textures.
Use a serrated knife for clean slices. Wipe the blade between cuts to avoid crumbs. For neat portions, chill the baked good 20 minutes before slicing. The structure firms up, making each piece photo-ready.
Rushing this stage risks tearing. Patience rewards you with slices that hold their shape on plates and in lunchboxes. Now’s the time to admire your work—or hide it from snackers.
Creative Add-Ins and Flavor Variations
Transform your loaf from simple to showstopping with mix-ins that add crunch, bursts of sweetness, or swirls of flavor. Customization lets you match textures to your mood—whether you crave nutty richness or fruity tang.
Balancing Mix-Ins Without Overpowering
Fold in ¾ cup chopped walnuts or vegan chocolate chips for classic appeal. Dried cranberries add tart contrast, while fresh blueberries create juicy pockets. Toss extras in flour first—this prevents sinking during baking.
| Add-In | Max Quantity | Texture Impact |
|---|---|---|
| Walnuts | 1 cup | Crunchy, hearty |
| Chocolate Chips | ⅔ cup | Melty, rich |
| Dried Fruit | ½ cup | Chewy, sweet |
Toppings That Stay Put
Press sliced almonds or sunflower seeds gently onto the top before baking. For a caramelized finish, brush with maple syrup and sprinkle oats. Let toppings set 2 minutes post-bake—they’ll stick without becoming soggy.
Swirl lovers: drop spoonfuls of peanut butter or cinnamon-sugar mix into poured batter. Use a knife to marble gently—overmixing blurs the pattern. These additions turn every slice into a flavor adventure.
Baking Tips and Troubleshooting
Even experienced bakers face challenges when perfecting their creations. This guide helps you spot—and fix—the most frequent issues while reinforcing techniques that prevent mishaps. Let’s turn frustration into flawless results.
Stop Stirring Sooner Than You Think
Overmixing is the #1 cause of dense results. Fold ingredients until just combined—streaks of flour are better than a smooth batter. Use the “ribbon test”: lift your spatula. If the mixture holds its shape briefly before falling back, you’ve mixed enough.
Old leavening agents sabotage lift. Test baking soda by sprinkling ¼ tsp into vinegar. If it doesn’t bubble vigorously, replace it. For every month past expiration, add ⅛ tsp extra to compensate.
Rescue Strategies for Frequent Flops
Burnt tops? Tent foil over the pan after 30 minutes. Pale crusts? Move the rack one position higher. If edges pull away but the center sinks, your oven runs hot. Reduce temperature by 25°F next time.
| Issue | Quick Fix | Prevention Tip |
|---|---|---|
| Gummy Center | Bake 5 extra minutes | Check doneness with thermometer (200°F) |
| Crumbly Slices | Cool 2 hours minimum | Use binding agents like flaxseed |
| Uneven Rise | Rotate pan halfway | Ensure oven fully preheated |
Dry crumbs often mean overbaking. Set multiple timers and check early. For sticky centers, let the loaf rest overnight—residual heat continues cooking without drying.
Serving Suggestions and Storage Tips
Your golden-crusted creation deserves a finale as thoughtful as its preparation. Slice it thick while slightly warm, letting plant-based butter melt into every pore. For dessert flair, toast pieces for 2 minutes and crown with dairy-free ice cream—contrasting temperatures create magic.
Presentation Ideas for a Delicious Finish
Dust slices with powdered sugar using a fine sieve. Arrange them diagonally on a rustic board with fresh berries. Room temperature servings let flavors shine brightest. Add crunch with toasted coconut flakes or a drizzle of maple syrup.
How to Keep Your Loaf Fresh
Wrap unsliced portions tightly in plastic wrap at room temperature for 48 hours. Refrigerate up to 5 days in an airtight container—microwave 15 seconds to revive softness. Freeze individual slices between parchment paper for 3 months.
Pro tip: Leave the cut side down on a plate. This prevents drying better than storing the whole loaf. Use wax paper instead of plastic wrap for eco-friendly storage that still locks in moisture.


