
Creamy Peanut Butter Cheesecake
Are you ready to indulge in a rich and creamy dessert that combines the best of both worlds? Imagine a velvety peanut butter filling nestled in a crunchy Oreo cookie crust.
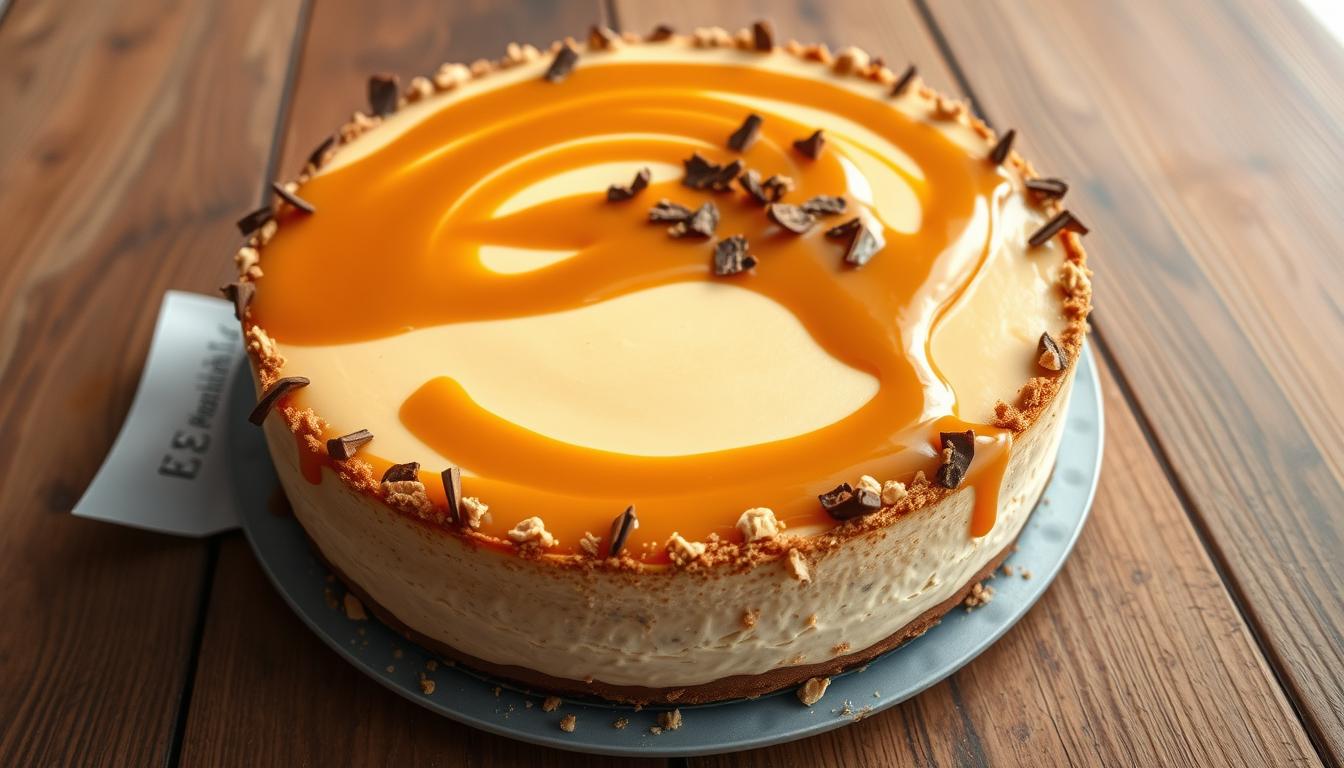
It’s topped with a luscious chocolate ganache that takes it to the next level.
This decadent dessert is not only a treat for the taste buds but also surprisingly accessible for home bakers. With its velvety cream texture and perfect balance of sweet and nutty flavors, it’s sure to impress even the most discerning dessert lovers.
Key Takeaways
- A rich and creamy peanut butter filling
- A crunchy Oreo cookie crust for added texture
- Luscious chocolate ganache topping for extra indulgence
- No water bath required, making it accessible for home bakers
- Perfect for special occasions or whenever you crave something spectacular
The Ultimate Peanut Butter Cheesecake Experience
Experience the ultimate peanut butter cheesecake, where every bite is a harmonious blend of smooth cheesecake and rich peanut butter flavor. This dessert is a game-changer for anyone who loves the combination of peanut butter and chocolate.
The peanut butter cheesecake recipe delivers a perfect balance between rich peanut flavor and classic cheesecake tanginess. The texture is exceptionally smooth and creamy, thanks to the careful balance of ingredients and preparation techniques.
- Avoids the fuss of a water bath, eliminating the risk of a soggy crust while producing perfect, crack-free results.
- Features a crisp Oreo cookie crust that complements the peanut butter filling beautifully.
- Topped with a decadent chocolate ganache, transforming it into a show-stopping dessert.
The recipe has been carefully tested and refined to ensure consistent results. It’s accessible even for those intimidated by making cheesecake from scratch. Each component contributes to the overall experience, from the crunchy crust to the creamy filling and the smooth ganache topping.
With its rich peanut butter flavor and smooth texture, this cheesecake is sure to impress. The addition of heavy cream really smoothes things out, ensuring a velvety consistency throughout.
Ingredients You’ll Need
A delicious peanut butter cheesecake requires a specific set of ingredients, which we’ll outline below. To ensure you can make this decadent dessert, we’ve broken down the necessary components into three main categories.
For the Oreo Crust
The crust is a crucial element, providing a crunchy contrast to the creamy filling. You’ll need Oreos and a bit of melted butter to create the perfect base. The Oreos should be crushed finely to ensure an even texture.
For the Peanut Butter Filling
The filling is where the magic happens, with a rich blend of peanut butter, cream cheese, and heavy cream. You’ll also need sugar, eggs, and a pinch of salt to balance the flavors.
The quality of the peanut butter will significantly impact the taste, so choose a high-grade option.
For the Chocolate Ganache
The chocolate ganache topping is made by combining high-quality chocolate and heavy cream in a microwave-safe bowl. Heat for 25 seconds, stir, and then heat for another 25 seconds. Stir until smooth.
The ratio of chocolate to cream is crucial for achieving the right consistency. For the best results, use semi-sweet or dark chocolate, as it provides a rich flavor that complements the peanut butter without overwhelming it.
To make the ganache, simply combine the chocolate and heavy cream. The ganache should be poured over the completely chilled cheesecake to ensure it sets properly. Allowing it to cool slightly before pouring will result in the best texture and appearance.
Essential Equipment for Perfect Results
Baking a creamy peanut butter cheesecake requires more than just great ingredients; it demands the right tools. To ensure your cheesecake turns out perfectly, you’ll need a few essential pieces of equipment.
A high-quality 9-inch springform pan is crucial for baking the perfect peanut butter cheesecake. This type of pan allows for easy removal of the cheesecake without damaging the crust or sides.
When using a springform pan, it’s also a good idea to have heavy-duty aluminum foil on hand to wrap around the pan if you choose to use a water bath method, preventing water from seeping into the crust.
To prepare the various components of your cheesecake, you’ll need multiple mixing bowls of various sizes. These bowls help keep ingredients organized and allow for proper preparation of the different parts of the cheesecake.
A food processor is also necessary for creating fine, even crumbs for the Oreo crust, ensuring a consistent texture throughout.
For the cheesecake filling, an electric stand mixer with a paddle attachment provides the ideal mixing power for creating a smooth, lump-free filling. You’ll also need a bowl for mixing and a rubber spatula for scraping down the sides and bottom of the mixing bowl, ensuring all ingredients are fully incorporated.
Other essential tools include a flat-bottomed measuring cup for pressing the crust evenly into the pan, and an instant-read thermometer to determine when the cheesecake is perfectly baked (around 150°F in the center).
Finally, a sharp knife and hot water are necessary for clean slicing when serving the finished cheesecake. With these tools, you’ll be well-equipped to produce a delicious and visually appealing peanut butter cheesecake.
Making the Perfect Oreo Crust
The Oreo crust is more than just a base; it’s a crucial component that elevates the entire cheesecake experience. To achieve this, you need to start with the right preparation.
Begin by removing the cream filling from the Oreo cookies. This prevents leakage during baking and ensures a more stable crust. Process the cookies in a food processor until they form fine, even crumbs for the best texture in your finished crust.
Next, combine the cookie crumbs with melted butter, ensuring all crumbs are evenly moistened but not soggy. Press the mixture firmly into the bottom and up the sides of your 9″ springform pan, using a flat-bottomed measuring cup for even pressure.
| Step | Description |
|---|---|
| 1 | Pulverize cookies into fine crumbs. |
| 2 | Mix crumbs with melted butter. |
| 3 | Press mixture into the pan. |
Extend the crust as high up the sides of the pan as possible, allowing for shrinkage during cooling and helping prevent cracks in your cheesecake. Pre-bake the crust for about 10 minutes at 325°F to set it before adding the filling.
A properly prepared crust will hold together when sliced but still provide a satisfying contrast to the creamy filling.
Creating the Creamy Peanut Butter Filling
A rich and creamy peanut butter filling is the heart of this decadent cheesecake. To achieve this, you need the right ingredients at room temperature, especially the cream cheese and eggs. This ensures they blend smoothly without forming lumps in the batter.
Begin by beating the cream cheese until it’s completely smooth. This step is crucial as it creates the perfect base for your filling. As “slow and steady is the way to go” when mixing, avoid beating in too much air.
Next, add the creamy peanut butter and sugar, mixing on low speed until just combined. Over-mixing is a common mistake that can lead to cracks, so mix slowly and only until the ingredients are incorporated.
Then, add the sour cream and vanilla, stirring well to combine. Gently stir in the eggs, one at a time, mixing until just combined after each addition. This helps maintain the proper texture of the batter.
The addition of heavy cream creates an exceptionally smooth and creamy texture that melts in your mouth. After adding the heavy cream, scrape the sides and bottom of the bowl to ensure all ingredients are fully incorporated. The finished batter should be completely smooth and uniform, with no visible lumps or streaks of cream cheese.
To finalize, pour the filling into the prepared crust carefully to avoid disturbing the crust or creating air bubbles. Tap the filled pan gently on the counter a few times to release any trapped air bubbles before baking. The consistency of the batter should be thick but pourable, similar to a thick pancake batter.
Baking Your Cheesecake Without a Water Bath
You can achieve a perfectly baked cheesecake without the hassle of a water bath. This peanut butter cheesecake recipe is specifically designed to be baked without one, eliminating the extra step while still producing perfect results.
To start, preheat your oven to 325°F (160°C). Bake the cheesecake for approximately 50 minutes. The edges should be set, but the center will still have a slight jiggle. It’s crucial to not overbake, as this can cause cracking.
Tips for a Crack-Free Cheesecake:
- Avoid opening the oven door during baking, as sudden temperature changes can cause the cheesecake to crack.
- After baking, turn off the oven and crack the door open slightly, allowing the cheesecake to cool gradually for about an hour.
- This slow cooling process is crucial for preventing cracks that can form when the cheesecake experiences rapid temperature changes.
Once the cheesecake has cooled to room temperature, refrigerate it for at least 6 hours (preferably overnight) to allow it to set completely.
The internal temperature of a perfectly baked cheesecake should reach about 150°F in the center when tested with an instant-read thermometer.
If you prefer using a water bath despite the recipe not requiring it, wrap the springform pan in multiple layers of heavy-duty foil to prevent water from seeping in.
The water bath method involves placing the wrapped springform pan in a larger roasting pan filled with hot water halfway up the sides of the cheesecake pan. However, baking without a water bath reduces the risk of a soggy crust that can occur when water leaks into the springform pan.
By following these tips, you’ll achieve a smooth, perfectly textured, and crack-free cheesecake without the need for a water bath.
Preparing and Adding the Chocolate Ganache
To complete your peanut butter cheesecake, prepare a luxurious chocolate ganache. This rich topping adds a beautiful contrast in both flavor and appearance, elevating your dessert to a new level.
First, ensure your cheesecake has chilled in the refrigerator for at least 6 hours. Then, in a medium-sized microwave-safe bowl, combine high-quality chocolate and heavy cream. Microwave on high for 25 seconds, stir, and microwave for another 25 seconds. Stir well until the chocolate and cream are completely smooth and melted, creating a velvety ganache.
The perfect ganache ratio is typically 1:1 chocolate to heavy cream by weight, achieving a pourable consistency that sets firmly without becoming too hard. Allow the ganache to cool slightly before pouring it over the cheesecake. It should be pourable but not hot enough to melt the filling.
| Ganache Preparation Steps | Timing |
|---|---|
| Microwave chocolate and cream | 25 seconds + 25 seconds |
| Stir ganache | Until smooth |
| Cool ganache | Until pourable |
| Refrigerate cheesecake with ganache | About 20 minutes |
Pour the ganache in the center of the cheesecake and use an offset spatula to guide it to the edges, creating an even layer on top. Return the cheesecake to the refrigerator for about 20 minutes to allow the ganache to set. For a decorative touch, you can swirl some peanut butter into the ganache or sprinkle chopped peanuts on top before it sets.
Storage Tips and Serving Suggestions
Once your peanut butter cheesecake is baked, the next steps are storing it properly and making it visually appealing. Proper storage is crucial to maintaining the cheesecake’s freshness and flavor.
To keep your cheesecake fresh, store it in the fridge for up to 5 days. You can store it in the springform pan covered with foil, making it easy to remove the ring when you’re ready to serve. If you want to store it for a longer period, you can freeze the cheesecake for up to 3 months. Make sure it’s tightly wrapped in plastic wrap followed by aluminum foil.
For the best flavor and texture, allow the cheesecake to sit at room temperature for about 30 minutes before serving. This simple step makes a significant difference in the overall experience.
When serving, use a sharp knife dipped in hot water and wiped clean between cuts to achieve clean, professional-looking slices. To make your cheesecake even more special, consider adding toppings like whipped cream, a drizzle of warm peanut butter, or chopped peanut butter cups.
For an elegant presentation, place each slice on a dessert plate with a small dollop of whipped cream and a light dusting of cocoa powder. Make sure to remove the cheesecake from the refrigerator at least 30 minutes before serving to allow it to reach the optimal flavor and texture.
With these storage and serving tips, your peanut butter cheesecake is sure to impress.


